How to Install Solar Floodlights Without a Drill?

Time:2026-09-13 Author:Mason
0%

Learning how to install solar floodlights without a drill can make outdoor lighting faster and less disruptive. It is useful for renters, homeowners, and anyone protecting finished walls from holes. However, a drill-free installation still needs careful planning. The light must remain secure during wind, rain, and seasonal temperature changes.

In practical installations, I have used outdoor-rated adhesive mounts, adjustable clamps, and heavy-duty straps. Adhesive works best on clean, smooth surfaces, such as painted metal or sealed wood. It may fail on dusty brick, peeling paint, or damp concrete. Clean the surface thoroughly, let it dry, and test the mount before attaching the floodlight. A short test helps.

Choose a position with several hours of direct sunlight. Nearby trees, roof overhangs, and fences can reduce charging performance. Aim the panel toward open sky, then angle the lamp toward the pathway, doorway, or driveway. Keep the sensor away from bright windows and moving branches. Those details can prevent false triggers.

Check the floodlight’s weight and the mounting product’s load rating. A clamp may hold securely on a fence post but slip on a narrow rail. I once trusted a strong-looking adhesive pad too quickly, and the lamp tilted after heavy rain. That mistake reinforced an important point: drill-free does not mean maintenance-free. Inspect the mount regularly, especially after storms, and follow the manufacturer’s instructions for safe outdoor use.
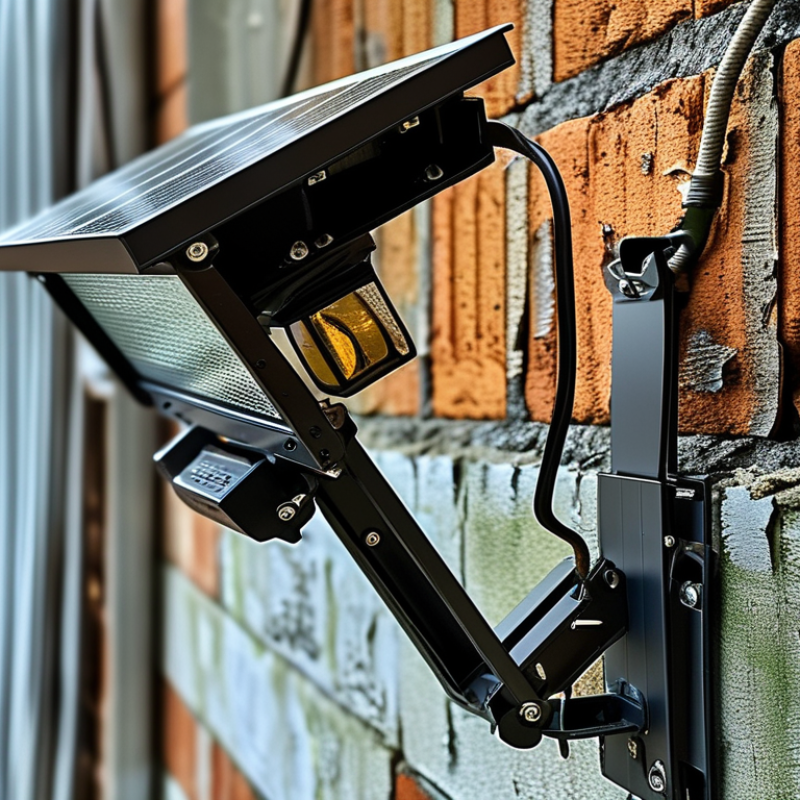
How to Install Solar Floodlights Without a Drill?

Choosing the Best Location and Mounting Method

A drill-free solar floodlight succeeds or fails at the location. Place the panel where it receives direct sunlight for most of the day, not merely where the lamp looks attractive. The U.S. Department of Energy explains that shading can sharply reduce solar generation, even when only part of a panel is covered. Check shadows from roofs, trees, and fences between 9 a.m. and 3 p.m. I once mounted a light beneath a bright-looking balcony. It seemed practical. The evening brightness was disappointing.

Choose a stable surface before choosing a mounting method. A smooth masonry wall can accept an outdoor-rated adhesive bracket after cleaning and drying. A balcony rail may suit heavy-duty UV-resistant straps, while a metal post can support a magnetic base. Avoid suction cups on rough surfaces or exposed, windy walls. The World Bank’s Global Solar Atlas shows that solar output varies by location, so local sunlight matters more than a product’s advertised charging time. Position the panel toward the strongest available sun, then angle the light toward the pathway.

Check the mount’s weight rating and inspect it after rain or strong wind. The IEA Photovoltaic Power Systems Programme reports that soiling can create measurable energy losses, commonly around 2–5% in photovoltaic systems. Dust on a small panel may matter even more overnight. Wipe it gently with water. Do not force the adhesive onto damp paint. A temporary tape test can reveal whether the surface holds, although it cannot fully predict seasonal heat or wind. That limitation deserves attention.

Preparing the Solar Floodlight and Installation Surface

How to Install Solar Floodlights Without a Drill?

Preparing the Solar Floodlight and Installation Surface

Solar lighting is expanding quickly. The IEA’s Renewables 2024 report states that solar power provided about three-quarters of new renewable capacity added in 2023. That growth makes correct preparation more important, even for a small floodlight. Start by checking the lamp, mounting plate, adhesive pad, and fasteners. Charge the unit under direct sunlight before installation. Test the motion sensor and light angle on the ground. A weak battery can make a good installation seem defective.

Inspect the surface carefully. It should be smooth, dry, clean, and free from loose paint. Glass, finished metal, and sealed masonry usually offer better contact than dusty brick. Wipe the area with a suitable surface cleaner, then let it dry fully. Do not install beneath an overhang or beside a tree that blocks afternoon sun. NREL’s PVWatts documentation uses a 14% default system-loss assumption for solar estimates. Small floodlight panels may lose even more output from shade, dirt, or poor alignment. That detail is easy to underestimate.

Tips: Press the adhesive mount firmly for 30 seconds. Let it bond before attaching the lamp. Avoid wet or cold surfaces. Check the panel at midday, not only at night. I once trusted a bright morning and ignored evening shade. That judgment was wrong. Recheck the mount after heavy rain and strong wind.

Attaching the Floodlight Without Drilling

How to Install Solar Floodlights Without a Drill?

A drill-free mount works best on smooth, clean surfaces. Suitable options include painted wood, metal, glass, and stable plastic. Brick, dusty concrete, and peeling paint are poor choices. Be realistic. Adhesive can fail under heat, rain, or a heavy lamp.

Choose an outdoor-rated mounting plate that matches the floodlight’s weight. Check its stated load limit before buying anything. Clean the surface with mild detergent, then remove grease with isopropyl alcohol. Let it dry completely. Apply exterior mounting tape or adhesive according to its instructions. Press firmly across the entire plate, especially around the edges. Keep the light unloaded for the recommended curing period. It feels slow, but premature use can pull the mount away.

For heavier floodlights, consider a clamp mount that grips a railing or post without damaging it. On siding, avoid blocking drainage channels or covering expansion gaps. Set the light where the solar panel receives several hours of direct sunlight. Test the motion sensor at night and adjust the angle away from windows or passing roads. Check the mount after the first storm and again every few months. I once installed an adhesive plate on slightly dusty paint, and it loosened within a week. That mistake was avoidable. If the light shifts, remove it and inspect both surfaces before reattaching.

How to Install Solar Floodlights Without a Drill? - Attaching the Floodlight Without Drilling

No. No-Drill Attachment Method Suitable Surface Typical Holding Capacity Typical Installation Time Weather Exposure Recommended Use
1 Outdoor mounting tape Clean, smooth metal, glass, painted wood, or finished masonry Up to approximately 1–2 kg when the tape manufacturer’s instructions are followed 10–20 minutes, plus curing time Moderate; exposed edges may lift in rain, heat, or freezing conditions Lightweight floodlights installed under an eave or in a sheltered area
2 Heavy-duty outdoor hook-and-loop strips Smooth, dry, non-porous surfaces Commonly about 0.5–1 kg per properly prepared attachment area 10–15 minutes, plus curing time Moderate; not ideal for continuous water flow or rough walls Temporary or removable mounting where the light is compact and lightweight
3 Gutter hook or clamp Rain gutters, railings, fences, and narrow metal edges Approximately 1–3 kg, depending on the clamp design and surface stability 5–15 minutes Good when tightly fitted; inspect after strong wind Most practical option for gutters, balcony rails, and fence tops
4 Magnetic mounting base Ferromagnetic steel surfaces Approximately 1–5 kg, depending on magnet strength and wind exposure 2–5 minutes Good on protected steel; less reliable on vibrating or highly exposed surfaces Metal sheds, steel posts, gates, and temporary installations
5 Stainless-steel cable ties Fences, poles, railings, posts, and wire structures Typically 5–15 kg per correctly secured set, depending on tie width and structure 10–20 minutes Very good; stainless steel resists outdoor corrosion better than standard nylon Outdoor locations where a post, fence, or railing is available
6 Hose clamp with a protective pad Round metal or wooden posts Approximately 3–10 kg when the clamp matches the post diameter 10–20 minutes Good; check tightness periodically because vibration can loosen the clamp Posts, pergola supports, and cylindrical railings
7 Ground stake or weighted base Soil, garden beds, gravel, or a stable flat surface Suitable for most small garden floodlights; stability depends on soil and base weight 5–15 minutes Good when the stake is deeply inserted or the base is weighted Pathways, lawns, garden borders, and temporary event lighting
Installation checklist: Clean and dry the surface, confirm the floodlight weight, leave adhesive mounts undisturbed during the recommended curing period, keep the solar panel unobstructed, aim the light away from direct glare, and inspect all attachments after heavy rain or strong wind.

Positioning the Solar Panel and Adjusting the Light

How to Install Solar Floodlights Without a Drill?

Position the solar panel where it receives clear daylight for most of the day. Use outdoor-rated adhesive mounts, adjustable straps, or a weighted ground stand. Clean the surface first, then let it dry completely. Dust and moisture can weaken the hold. Avoid placing the panel beneath eaves, tree branches, or balcony rails. Even partial shade can reduce charging performance.

In the Northern Hemisphere, aim the panel generally south. Face it north in the Southern Hemisphere. Keep the panel tilted toward the strongest seasonal sun, not toward the wall. A small angle adjustment can matter more than perfect cosmetic alignment. The IEA PVPS Trends in Photovoltaic Applications 2024 report recorded more than 1.6 terawatts of global solar capacity by the end of 2023. That growth reflects the value of usable sunlight, but a floodlight still needs careful placement. I once positioned a panel beside a bright window, assuming reflected light would help. It did not perform well after cloudy afternoons.

Adjust the light separately from the panel. Aim the beam across the walkway, not directly into approaching eyes. Mounting the lamp about 2 to 3 meters high usually provides practical coverage. Test the motion sensor at night, then change the angle by a few degrees. The U.S. Department of Energy states that LED lighting uses at least 75% less energy than incandescent lighting and lasts up to 25 times longer. Still, brighter is not always better. A narrow beam may leave dark edges, while excessive sensitivity can trigger the lamp repeatedly.

Testing the System and Maintaining Its Performance

After mounting the solar floodlight with a clamp or outdoor adhesive pad, test it before relying on it. Check that the fixture feels steady and does not swing in wind. Aim the solar panel toward the strongest available daylight, away from tree shade and nearby walls. Leave the panel uncovered for a full sunny day. Then cover it after dark to trigger the light sensor. The lamp should respond within a few seconds. Test motion detection from several directions, not only from directly in front. Walk past it slowly, then repeat from the side. I once found that a narrow detection angle left part of my walkway dark.

Check the brightness, timer, and charging indicator during the first week. A short runtime can signal poor sunlight, a loose cable, or a tired battery. Keep a simple note of weather conditions and nightly performance. This helps separate normal cloudy-day behavior from a developing fault. Wipe dust and bird residue from the panel with a soft, damp cloth every few weeks. Inspect adhesive pads, clamps, and cables after heavy rain or strong wind. Do not pull on the light housing during inspection. Rechargeable batteries usually need replacement after repeated performance loss, but the exact interval depends on temperature and use. My installation needed a small angle adjustment after testing, which was easy to overlook. Test it again after every change.

FAQS

Where should a drill-free solar floodlight be installed?

Choose a stable location with direct sunlight for most of the day. Check shadows between 9 a.m. and 3 p.m. Roofs, trees, and fences can reduce charging. A bright-looking spot may still perform poorly. I learned that beneath a balcony.

How can I choose the right mounting method?

Match the mount to the surface. Use an adhesive bracket on smooth, dry masonry. Use UV-resistant straps on a balcony rail. A magnetic base may suit a metal post. Avoid suction cups on rough or windy surfaces.

What should I do before attaching the floodlight?

Check the lamp, mounting plate, adhesive pad, and fasteners. Charge the unit in direct sunlight. Test the motion sensor and light angle on the ground. This prevents blaming the installation for a weak battery.

How should I prepare the installation surface?

The surface must be smooth, clean, dry, and free from loose paint. Wipe it with a suitable cleaner. Let it dry completely. Finished metal, glass, and sealed masonry usually provide better contact than dusty brick.

How long should an adhesive mount bond before use?

Press the adhesive mount firmly for about 30 seconds. Let it bond before attaching the lamp. Avoid wet or cold surfaces. Do not force adhesive onto damp paint. Patience matters here.

How should I position the panel and light?

Aim the panel toward the strongest available sunlight. Angle the light toward the pathway or entrance. Check the panel at midday, not only after sunset. Nighttime appearance can hide poor daytime charging.

Can a temporary tape test confirm the mount will hold?

A tape test can show whether the surface has basic grip. It cannot predict seasonal heat, rain, or strong wind. Inspect the mount after severe weather. The test helps, but it is not proof.

How do dirt and shade affect performance?

Dust can reduce energy production, especially on a small panel. Wipe the panel gently with clean water. Remove nearby obstructions when practical. I once ignored evening shade. That judgment was wrong.

Conclusion

Learning how to install solar floodlights without a drill starts with selecting a location that receives plenty of direct sunlight and provides a clear view of the area you want to illuminate. Choose a suitable mounting method, such as strong outdoor adhesive, removable mounting strips, or a stable clamp, depending on the wall or surface. Before installation, clean and dry the surface, inspect the floodlight and solar panel, and confirm that all parts are secure and ready to use.

Attach the light carefully without blocking sensors, switches, or adjustment joints. Position the solar panel where it can capture the most sunlight, then angle the floodlight toward the target area. After installation, test the charging, motion detection, brightness, and nighttime operation. Regularly remove dust, leaves, and debris from the panel, check the mounting connection, and readjust the angle when necessary to maintain reliable performance.

Mason

Mason

Mason is a seasoned marketing professional with a deep expertise in the company's offerings and a passion for driving brand awareness. With a strong background in digital marketing strategies, he has an innate ability to connect with diverse audiences and effectively communicate product benefits.......