Replacing batteries in solar garden lights is a crucial task for maintaining their functionality and longevity. According to the Solar Energy Industries Association, nearly 80% of solar lights fail due to battery issues. This statistic highlights the importance of understanding how to replace batteries in solar garden lights correctly. As expert Mark Jensen states, “Proper battery care can extend the life of your solar garden lights significantly.”
When it comes to battery replacement, knowing the right type of battery is essential. Most solar lights use rechargeable NiMH or Li-ion batteries. Choosing the right battery can mean the difference between a functional light and a dim disappointment. Regularly checking the batteries can also prevent premature burnout and save money in the long run. Yet, many people overlook this simple maintenance task.
It's easy to assume that replacing batteries is straightforward. However, misjudging battery types or failing to check connections can lead to greater problems. Many users end up frustrated when lights still do not work after a replacement. This highlights the need for guidance on how to replace batteries in solar garden lights effectively. Taking these considerations into account will help ensure your outdoor space stays beautifully lit.
When it comes to solar garden lights, knowing when to replace the batteries can be challenging. Typically, these batteries last between one to three years. Signs of aging include dim lights or inconsistent performance. If your lights flicker or fail to charge during the day, this might indicate it's time for a replacement.
Pay attention to the season too. In colder months, battery performance may drop. Monitor the time your lights stay illuminated at night. If they don’t shine brightly for several hours, consider checking the batteries. Sometimes, dirt or debris in the solar panel can also be a culprit. A clean solar panel may enhance charging efficiency, making the lights brighter.
Remember, not all batteries are the same. Opt for batteries that match the specifications of your lights. This ensures reliable performance and longevity. It can be easy to overlook these details, but they are crucial for maintaining your garden ambiance. Regular maintenance, including checking connections, can extend battery life. Reflecting on these aspects can truly enhance your experience with solar garden lights.
When it comes to replacing batteries in solar garden lights, choosing the right type is crucial. Many solar garden lights use nickel-metal hydride (NiMH) batteries for their superior performance. According to a 2021 industry report, NiMH batteries can provide up to 20% longer run times compared to traditional alkaline varieties. They are not only efficient but also more eco-friendly.
Tips for selecting the right battery: Look for batteries with a capacity of at least 2000 mAh. Higher capacity means longer lighting hours. Ensure the battery fits your light fixtures. Some models may require specific sizes, impacting performance. While lithium-ion batteries are gaining popularity, they may not always be compatible with older models.
It’s essential to reflect on your battery performance issues. Sometimes, lights fail to shine brightly due to incorrect battery types. Regularly checking the condition of your batteries will enhance their lifespan. Pay attention to any corrosion, as this can interfere with charging and overall functionality. Make decisions based on reliable information, keeping your garden lights vibrant and inviting.
Replacing batteries in solar garden lights can be a straightforward task if approached correctly. Start by gathering your tools. You will need a screwdriver, extra batteries, and gloves. Always wear gloves to protect yourself. Make sure the solar lights are turned off before beginning. This helps avoid any electrical mishaps.
Carefully remove the cover of the light. This can sometimes be tricky; some models have screws while others simply pop off. Take your time and avoid using excessive force. Once you access the battery compartment, note the battery orientation. This will help you insert the new batteries correctly later. Look for signs of corrosion on the terminals. If you find any, clean it gently with a cloth.
After replacing the batteries, it's a good idea to test the lights. Leave them in direct sunlight for a day to ensure they recharge. Monitor them over the next few days. If they don’t work, you may need to reflect on your battery choice or the solar panel's condition.
This process can be frustrating, but each attempt helps you learn more about your solar lights.
When it comes to solar garden light batteries, proper care is essential for longevity. One effective way to extend their lifespan is by keeping them clean. Dust and debris can accumulate on solar panels, reducing their efficiency. Regularly wipe the panels with a soft cloth to ensure optimal energy absorption. Observe how dirt impacts performance. You may need to adjust your cleaning schedule based on weather conditions.
Another tip is to monitor the battery charge cycle. Most solar batteries perform best when charged fully and drained completely. Test their capacity every few months to identify any issues early. Sometimes, you'll notice a significant drop in performance. This is a signal that it might be time for a replacement. Don’t ignore these signs. It’s better to replace a weak battery than to let your lights remain dim.
Lastly, consider the placement of your solar lights. Poor positioning can lead to insufficient sunlight exposure. Check that your lights receive adequate daily sunlight. If they are under trees or other obstructions, consider relocating them. Reflection and shadowing can affect charging. Don’t hesitate to experiment with different spots. Finding the right location can make a noticeable difference in battery life.
When you're ready to replace batteries in your solar garden lights, it's crucial to consider how to properly dispose of the old ones. Many people overlook this step, unaware that improper disposal can harm the environment. According to the EPA, 3.7 million tons of batteries end up in landfills each year. This can lead to the release of toxic substances like lead and cadmium into the ground.
To ensure safe disposal, first check if your batteries are rechargeable. Many battery retailers offer recycling programs for old batteries, making it convenient to discard them responsibly. Some municipal waste management services also provide collection events specifically for hazardous waste. Engaging in these programs helps minimize harmful waste and supports community recycling efforts.
When replacing your garden light batteries, safety is paramount. Wear gloves while handling old batteries to avoid any potential leakage. Additionally, always store old batteries in a cool, dry place until you can properly recycle them. This will prevent any unforeseen accidents and keep your surroundings safe. Pollution from discarded batteries can impact local ecosystems, so taking small steps can lead to significant positive changes.
| Tip | Details | Disposal Method |
|---|---|---|
| Identify the Type | Check the specific battery type used in your solar garden lights, typically NiMH or lithium. | Take to a local recycling center that handles batteries. |
| Wear Gloves | Always wear gloves when handling old batteries to prevent skin contact with any corrosive material. | Dispose of gloves with regular waste. |
| Follow Instructions | Refer to the manufacturer’s instructions for battery replacement and recycling options. | Contact the manufacturer for specific disposal guidelines. |
| Rechargeable Options | Consider switching to rechargeable batteries that have a longer lifespan. | Recycle used rechargeable batteries at designated drop-off points. |
| Store Batteries Safely | Keep removed batteries in a safe, dry place until you can dispose of them properly. | Seal them in a plastic bag to avoid leakage. |
: They usually last between one to three years.
Dim lights, flickering, or failure to charge during the day are signs.
In colder months, battery performance may decline significantly.
Check the batteries and ensure the solar panel is clean.
Nickel-metal hydride (NiMH) batteries are preferred for their efficiency.
Regular cleaning is essential; adjust based on dust and weather conditions.
Fully charging and draining the batteries helps identify issues early.
Poor placement can result in insufficient sunlight exposure, affecting performance.
Corrosion can hinder charging, so inspect and replace the batteries if necessary.
Regular maintenance, including cleaning and checking battery conditions, helps.
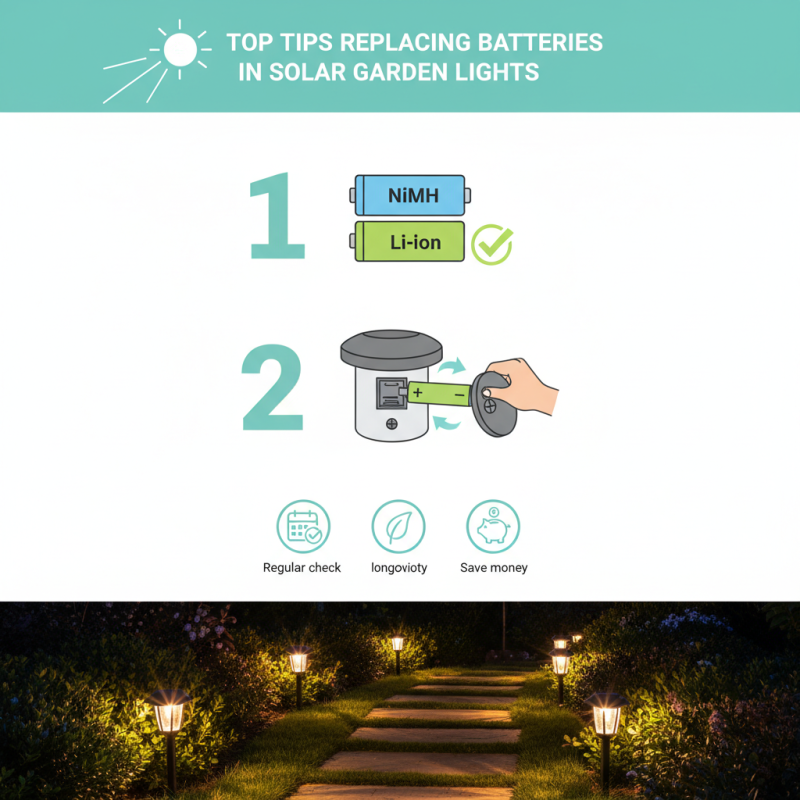
Replacing batteries in solar garden lights is essential for maintaining their functionality and brightness. First, it’s important to recognize when your batteries need replacement, typically indicated by dim lighting or complete failure to power on. Choosing the right type of battery is crucial; common options include NiMH and lithium batteries.
To effectively learn how to replace batteries in solar garden lights, follow a step-by-step guide that ensures safety and efficiency. Additionally, you can extend the lifespan of these batteries through proper care, such as keeping the solar panels clean and placing the lights in optimal sunlight. Lastly, dispose of old batteries responsibly to minimize environmental impact. By following these tips, you can enhance the performance and longevity of your solar garden lights.
Sanitize Light